
Exploring Mini Worlds: Macro Photography
- Sarah
- Apr 25
- 4 min read
It is easy to overlook the things we cannot see with our naked eye in every day life.
When I think about Macro Photography, I think back to my childhood and the movie "Honey, I Shrunk The Kids!". Great movie - and a great perspective! In the movie, a seemingly bland and mundane lawn turns into an unlikely fantastical world - giant insects, huge rocks, and trees we've never even thought of seeing in real life. However, all of the creatures and landscape we see in the movie are not really fictitious - we just see them from a whole new perspective. Queue in Macro Photography....
In this post, you will learn what Macro Photography is, what you will need to start, and suggestions to get exploring!

What Is Macro Photography?
Macro photography focuses on capturing subjects at very close distances to reveal details not visible to the human eye. Unlike standard photography, which captures objects as we see them, macro photography magnifies tiny subjects, sometimes at life-size or greater. The type of camera lens used, the distance from the subject, and the settings of the camera can all affect the outcome, and the amount of detail you may see in your photograph.
This technique is popular for photographing insects, flowers, textures, and small objects. It requires specialized equipment and techniques to achieve sharp focus and proper lighting at such close range. I have seen many great macro photographs taken with new cellphones, but most of the high detail photographs tend to be taken with mirrorless or DSLR cameras.
Essential Equipment for Macro Photography
To capture the tiny world effectively, you need the right tools. Here are the key pieces of equipment:
Macro Lens
A dedicated macro lens allows close focusing and high magnification. Look for lenses with a 1:1 reproduction ratio, meaning the subject appears life-size on the camera sensor.
Extension Tubes
These fit between your camera body and lens to reduce the minimum focusing distance, increasing magnification without buying a new lens.
Close-up Filters
These screw onto the front of a lens and act like magnifying glasses, offering a budget-friendly way to try macro photography.
Tripod
Stability is crucial when shooting close-ups. A sturdy tripod helps avoid camera shake and allows precise composition.
Lighting
Natural light can work well, but sometimes additional light sources like ring flashes or LED panels are needed to illuminate small subjects evenly.
Focus Rail
For extreme close-ups, a focus rail lets you move the camera in tiny increments to achieve perfect focus.
Techniques to Capture Stunning Macro Photographs
Mastering micro photography involves more than just equipment. Here are practical tips to improve your images:
Use Manual Focus
Autofocus can struggle at close distances. Switch to manual focus to control exactly where the sharpest point lies.
Control Depth of Field
At high magnifications, depth of field becomes very shallow. Use smaller apertures (higher f-numbers) to increase the area in focus, but balance this with the need for enough light.
Steady Your Camera
Even slight movements blur details. Use a tripod and a remote shutter release or timer to reduce shake.
Choose the Right Background
A clean, uncluttered background helps the subject stand out. You can use colored paper or natural settings depending on the effect you want.
Experiment with Angles
Different perspectives reveal unique details. Try shooting from above, side, or even below your subject.
Patience and Observation
Small subjects can be unpredictable. Take your time to observe and wait for the best moment, especially with insects or flowers moving in the wind. Be prepared to change locations depending on the movements of your subject/s and the lighting at each moment.
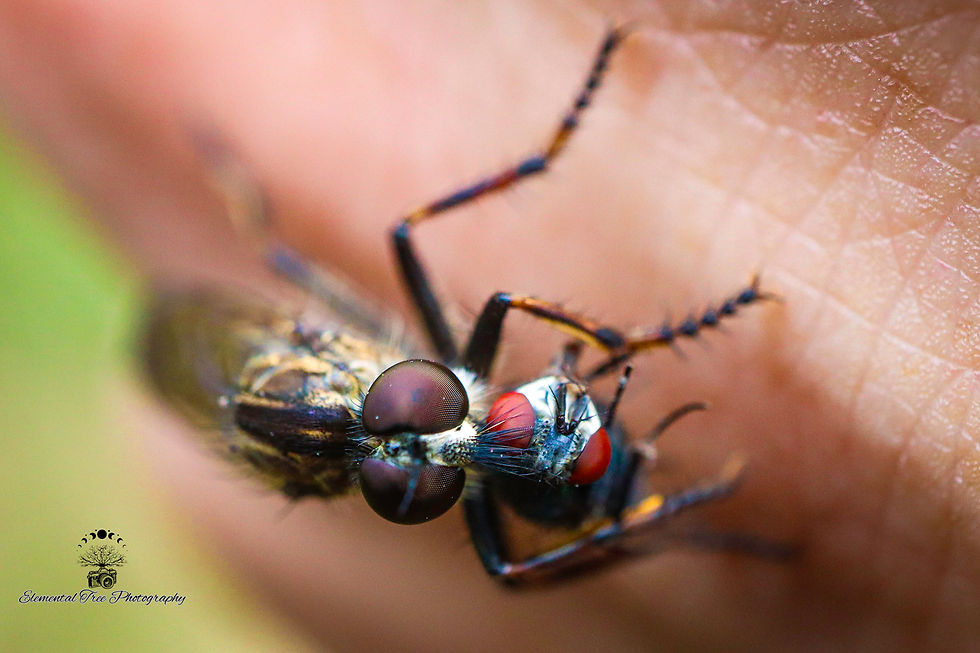
Subjects That Stand Out in Macro Photography

Macro photography opens up endless possibilities. Here are some popular subjects that reveal fascinating details:
Insects
Capture the complex eyes, wings, and textures of butterflies, bees, or beetles.
Plants and Flowers
Focus on petals, pollen, or leaf veins to show natural patterns and colors.
Water Droplets
Drops on leaves, branches, or spider webs create reflections and magnify tiny scenes.
Textures
Everyday objects like fabric, wood grain, or rust take on new life when viewed up close.
Food
Fruits, spices, and baked goods show interesting textures and colors under magnification.
Post-Processing Tips for Macro Photography

Editing your photos can enhance details and correct minor issues. Consider these steps:
Sharpening
Apply selective sharpening to emphasize textures without increasing noise.
Adjust Contrast and Brightness
Fine-tune these settings to make details pop.
Crop for Composition
Tighten your framing to focus attention on the subject.
Remove Distractions
Use cloning or healing tools to clean up dust or unwanted elements.
Color Correction
Adjust white balance to ensure natural colors, especially under artificial lighting.
Challenges and How to Overcome Them
Micro photography can be demanding. Here are common challenges and solutions:
Limited Depth of Field
Use focus stacking, a technique where multiple images at different focus points are combined to increase sharpness throughout the subject.
Lighting Issues
Diffuse harsh light with softboxes or white reflectors to avoid strong shadows.
Subject Movement
Photograph indoors or on calm days. For insects, use patience or try photographing early morning when they are less active.
Camera Shake
Use a tripod, remote shutter, or image stabilization features.
Play Around with Settings
Don't be afraid to change your settings if you are not getting the quality of image that you want. I tend to take multiple photographs of the same scenes with different settings often, since I know when I get back to my studio, I can keep what looks good and discard what does not. I have found many "happy mistakes" by using this method. It also helps you to learn your camera settings better.
Getting Started with Your Own Macro Photography

You don’t need expensive gear to begin. Start with these steps:
Use a smartphone with clip-on macro lenses.
Find small subjects in your garden or home.
Practice steadying your camera and focusing manually.
Experiment with natural light and simple backgrounds.
Review your images and try different angles and settings.
As you gain experience, consider investing in a macro lens and lighting equipment.
Comments